PuppiPlan Intro : PuppySchoolRaspberryPi Faqs : Puppi Deb : PuppiArch RacyPi : PARM : PuppiNews News
Categories
CategoryMenu
So what is this exactly?
This is Arch Linux with Puppy small efficient programs added. Designed for the legendary ARM motherboard - 'Raspberry Pi'
How do I get Puppi Arch?
You don't. Not yet. You make it! You customise it!
Your Puppy, your choices! It is the Arch way + Puppy Power.
Later we will have a ready made real PuppySchoolRaspberryPi Puppi Arch
Get me started!
OK - you got it!
Step 1 download and install the Arch image file for Raspberry Pi on a SD card
With Puppy
In Puppy Slacko and most modern Puppys
click on the downloaded Arch zip.
It will extract/expand
Move to the directory of the unzipped image
from a console right clicking and select new terminal type:
# dd bs=1M if=archlinuxarm-29-04-2012.img of=/dev/sdc
The part archlinuxarm-29-04-2012.img is the 'image'. With a later image
replace with the updated .img file
Other methods using other distros and Windows
Step 2 run 'Arch'
boot up
login root
password root
You are now at the Arch command line
Step 3 Update 'Arch'
Arch is a rolling release - constantly updated .
Update command can take a while - took about 20 minutes on broadband
pacman -S pacman
pacman -Syu
Step 4 install JWM Window Manager
This will give you the 'Puppy standard' Joes Window Manager . . .
pacman -S xf86-video-fbdev jwm
Step 5 start JWM Window Manager
warning The process to install xinit is awaiting documentation
xinit /usr/bin/jwm

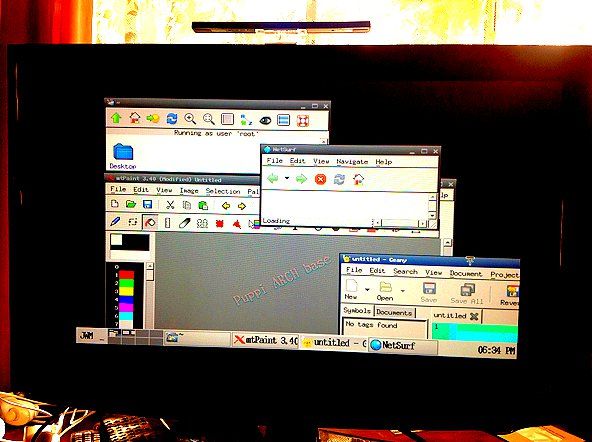
Puppification of Arch Linux for Raspberry Pi - JWM, Rox, Geany and mtpaint for Puppi using Arch binaries
Step 6 add Puppy style programs
Open the terminal
pacman -S rox geany mtpaint netsurf
Step 7 add better fonts
optional but recommended
open terminal
pacman -S ttf-dejavu
Step 8 run programs
Open the terminal and type
rox or geany etc
Step 9 Create an image file of my changes for other Puppi Users?
Step 10 Add programs compiled for Raspberry Pi ARM v6
Step 11 Add/Create custom Bacon Programs
Put SYNC after DISPLAY
like so
Code:
DISPLAY
SYNC
on programs using HUG
Step 12 Add Multimedia capability
sound test
pacman -S alsa-utils alsa-oss alsa-plugins
gpasswd -a root audio
speaker-test -c 2
sudo modprobe snd_bcm2835 at prompt after login / before "startx" for sound
pacman -S deadbeef
Useful tips/commands
- tar xvzf something.tar.gz decompresses files eg. gtkdialog for ARM
- If you want root access "sudo passwd root" at prompt after login / before "startx".
Where do I read more info?
arch: got it to boot to a command line. Is there really no graphical desktop installed?
Update system
pacman -Syyu
Install X
Code:
pacman -S xorg-server xorg-xinit xorg-server-utils mesa mesa-demos xorg-twm xorg-xclock xterm rox xf86-video-fbdev dbus
rc.d start dbus
Add dbus to the DAEMONS array in /etc/rc.conf (you can do this later).
How do Install some fonts:
Code:
pacman -S ttf-dejavu
Start the X server:
Code:
startx
Some terminals will appear on a desktop. To get a pinboard, type:
Code:
rox -p pin
Categories
CategoryTutorialCategoryARM